
Bloomreach Set Up
Prerequisites
Administrator access required — You need sufficient permissions in TRIFFT and Bloomreach to create API credentials, configure webhooks, manage integrations, and test customer events.
Before you begin, gather the following:
| Requirement | Details |
|---|---|
| TRIFFT project | An active TRIFFT project with members and the relevant loyalty mechanics configured. |
| Bloomreach project | Access to the correct Bloomreach Engagement project. |
| Bloomreach permissions | Access to Project settings, Access management, API groups, Integrations, Scenarios, and relevant communication channels. |
| TRIFFT permissions | Access to Settings → Webhooks, Settings → API Keys, and Settings → Integrations → Bloomreach. |
| Member identity | A defined Bloomreach Hard ID and/or Soft ID strategy that can identify the same member in both systems. |
| Test member | A test customer with known identifiers and access to a test device when mobile push is included. |
| Mobile credentials | APNs credentials for iOS and/or a Firebase service-account key for Android when Bloomreach sends mobile push. |
Integration architecture
A complete two-way integration consists of four core steps:
| Direction | Step |
|---|---|
| TRIFFT → Bloomreach |
|
| TRIFFT → Bloomreach |
|
| Bloomreach → TRIFFT |
|
| Bloomreach → TRIFFT |
|
Optional extensions include Client Zone tracking, Bloomreach In-App Personalization, Apple Push Notification Service, and Firebase Cloud Messaging.
1. Create Bloomreach API authorization for TRIFFT
TRIFFT needs the following Bloomreach connection details:
- API Base URL
- Project Token
- API Key
- API Secret
Retrieve the API Base URL and Project Token
-
Log in to the correct Bloomreach project.
-
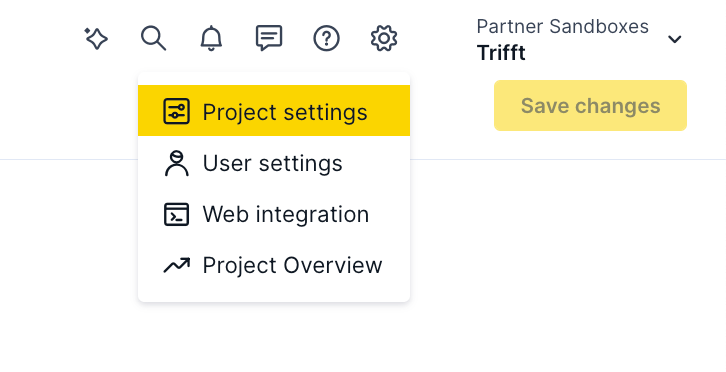
Click the gear icon in the top-right corner.
-
Open Project settings.
-
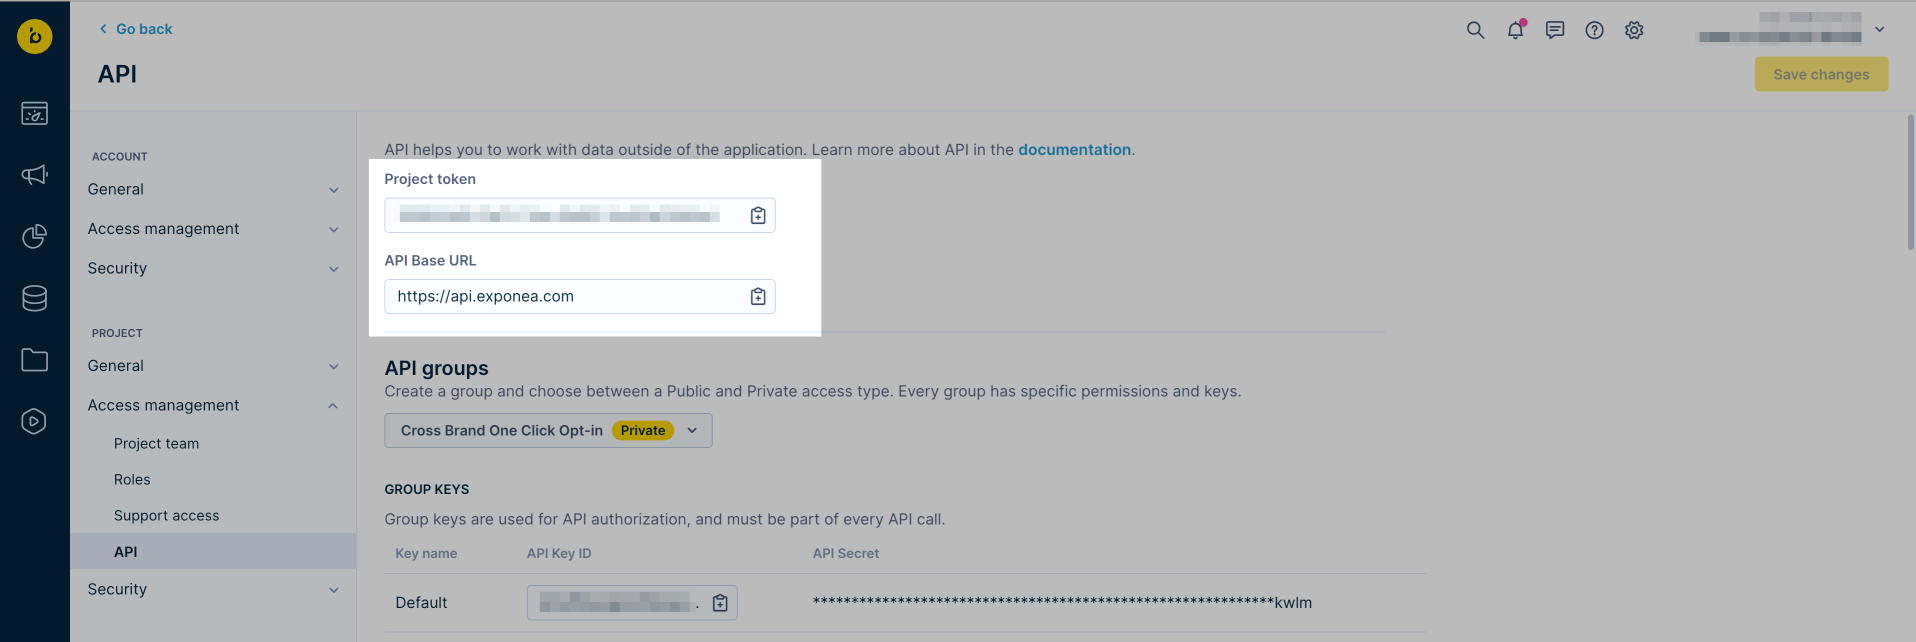
In the left navigation, go to Access management → API.
-
Copy the Project Token and API Base URL shown at the top of the page.
Generate the API Key and API Secret
-
Stay on the Bloomreach API page.
-
Scroll to API groups.
-
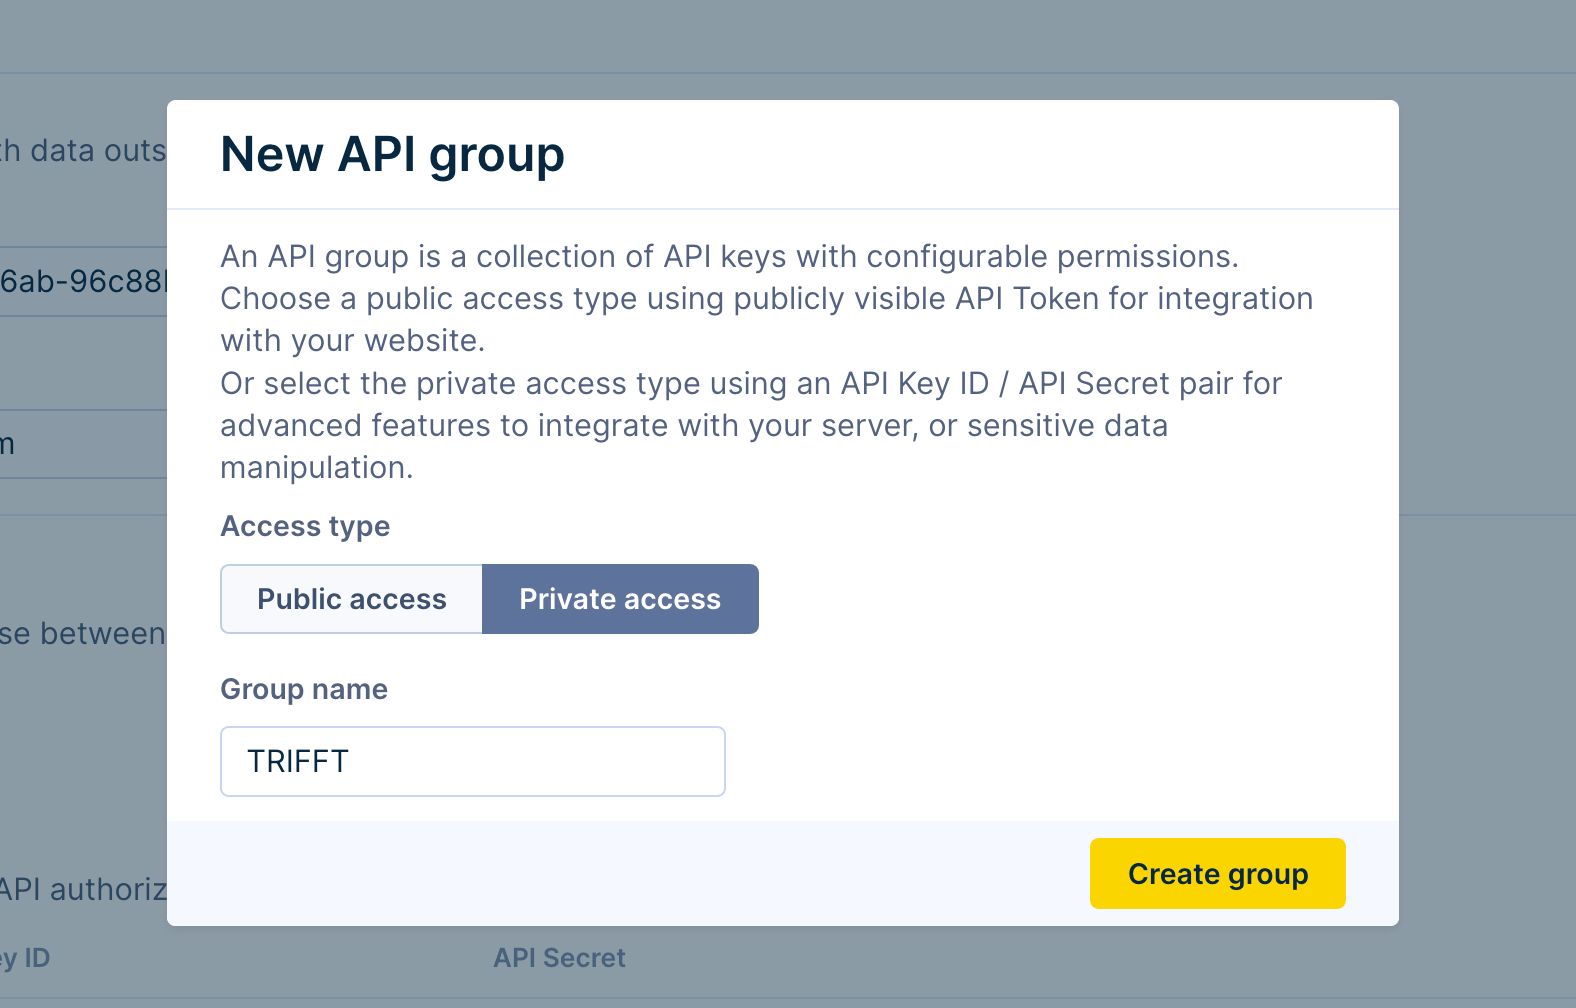
Select New group.
-
Set access type to Private access.
-
Name the group, for example
TRIFFT. -
Create the group.
-
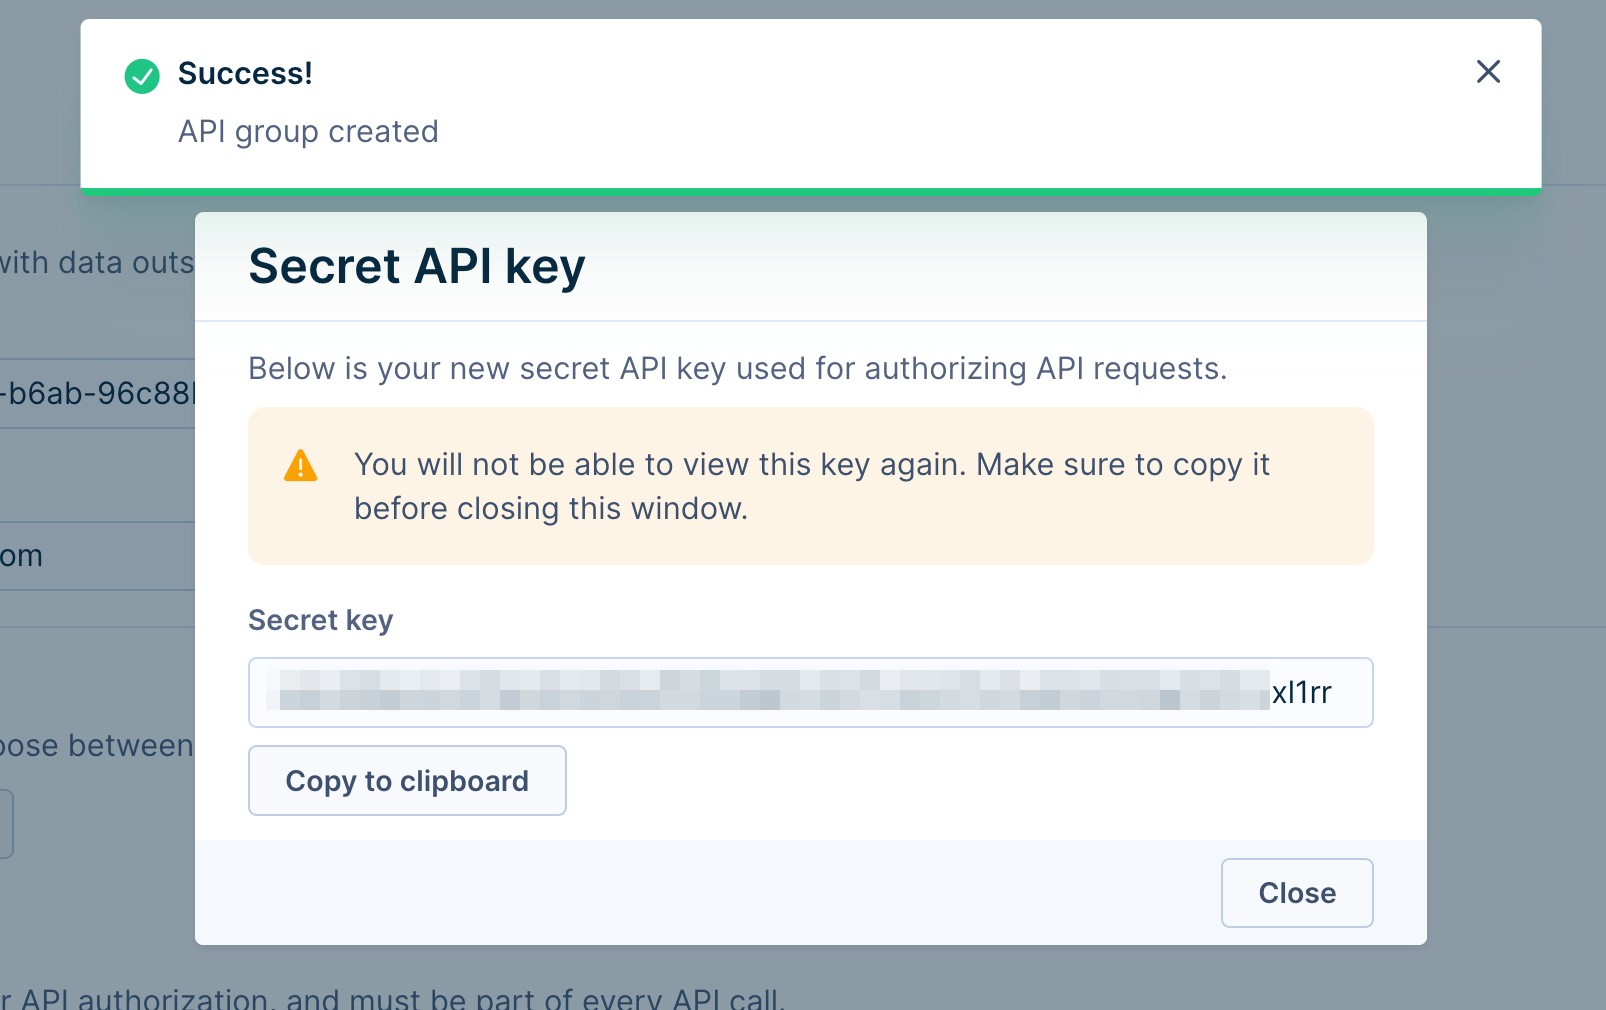
Copy and securely store the API Secret shown in the popup.
-
Copy the API Key from the Group keys section.
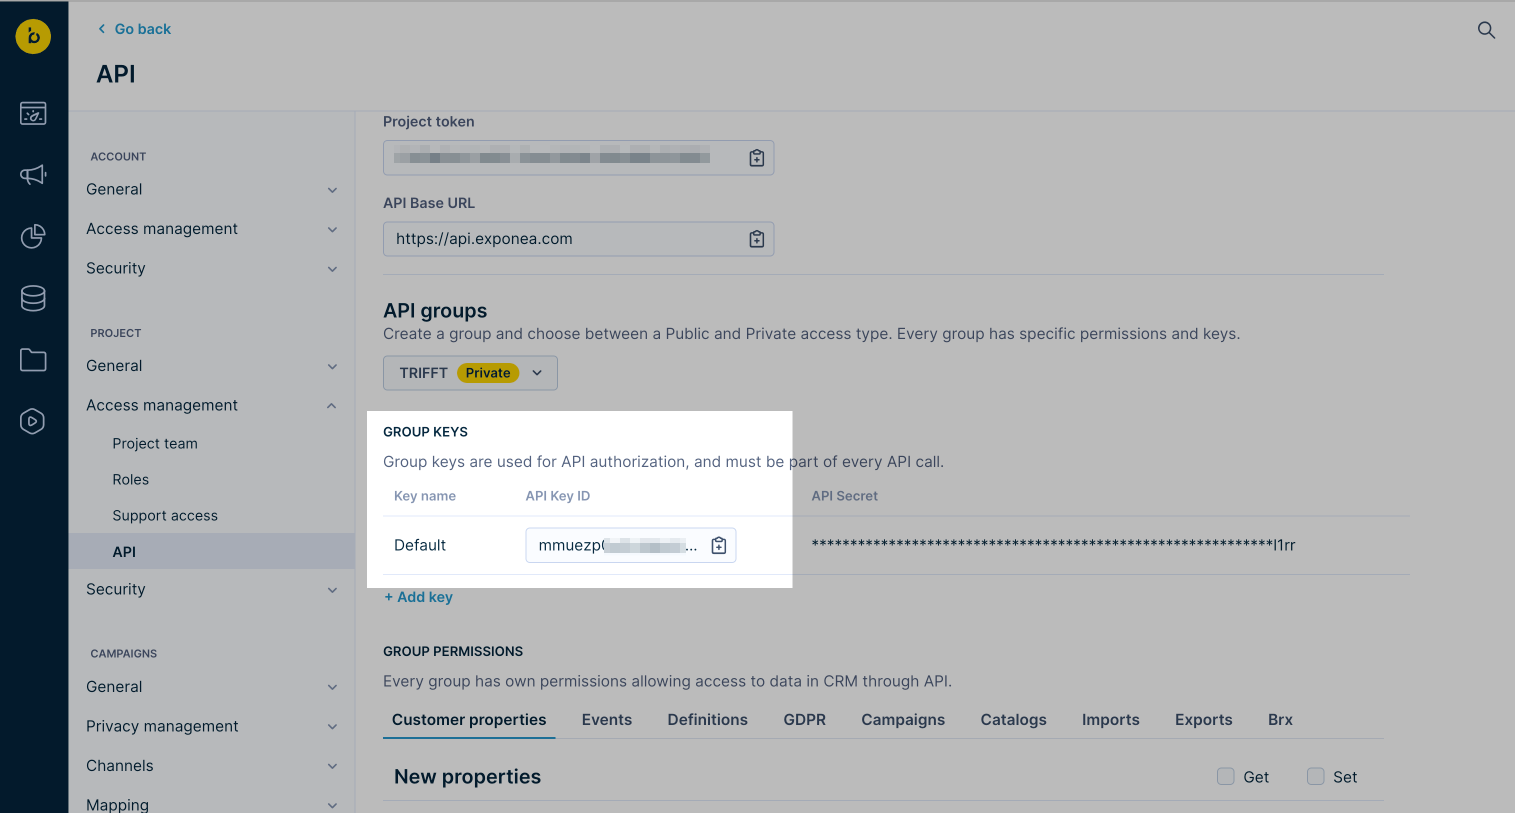
Store the API Secret immediately and securely. Treat the API Key and API Secret as credentials and do not include them in screenshots, tickets, or public documentation.
Assign required permissions
Enable both GET and SET permissions for:
- Customer Properties
- Events
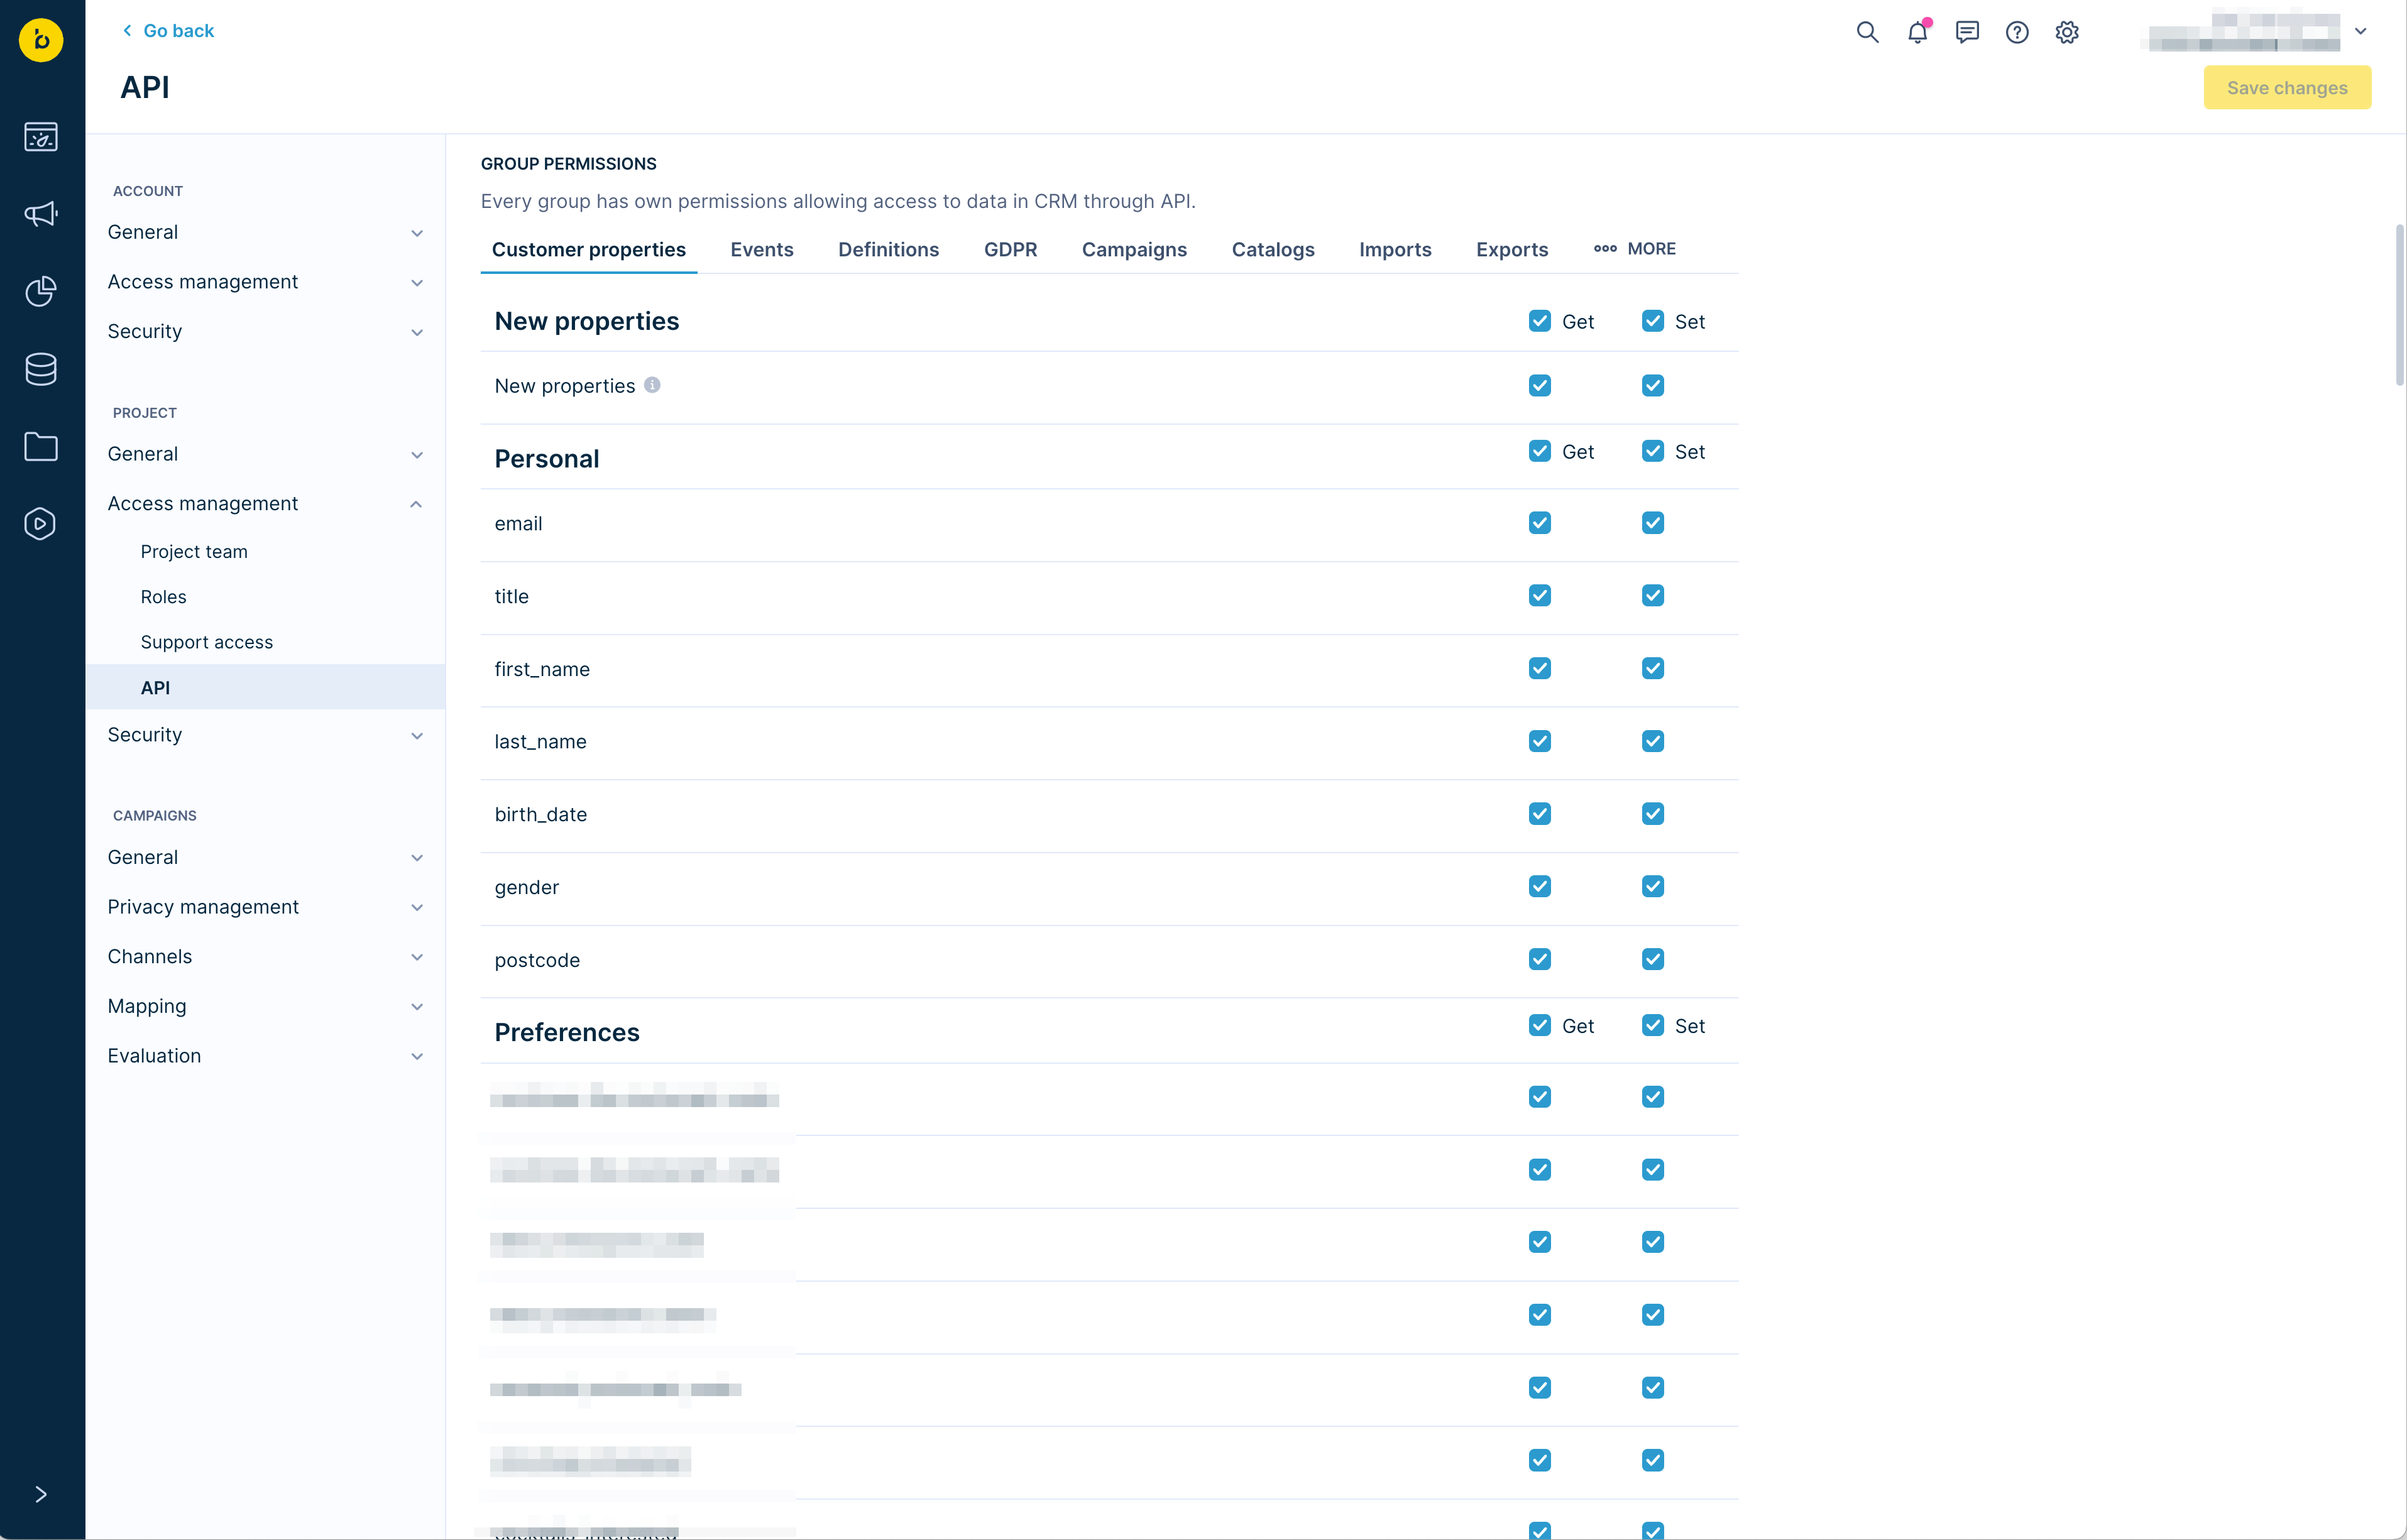
These permissions allow TRIFFT to send events and customer-related data to Bloomreach.
Enable the Bloomreach integration in TRIFFT
- In TRIFFT, navigate to Settings → Integrations → Bloomreach.
- Enable the integration.
- Enter the connection values available in the project configuration, including the Base Endpoint, Project Token, and authorization credentials/token.
- Save the configuration.
- Keep optional tracking channels disabled until they are required and ready for testing.
The exact fields shown can depend on the enabled TRIFFT touchpoints and implementation. Use the values from the same Bloomreach project that owns the API group created above.
2. Configure TRIFFT → Bloomreach event delivery
Create Bloomreach authorization in TRIFFT
- In TRIFFT, navigate to Settings → Webhooks.
- Open the Authorizations tab.
- Click Add new.
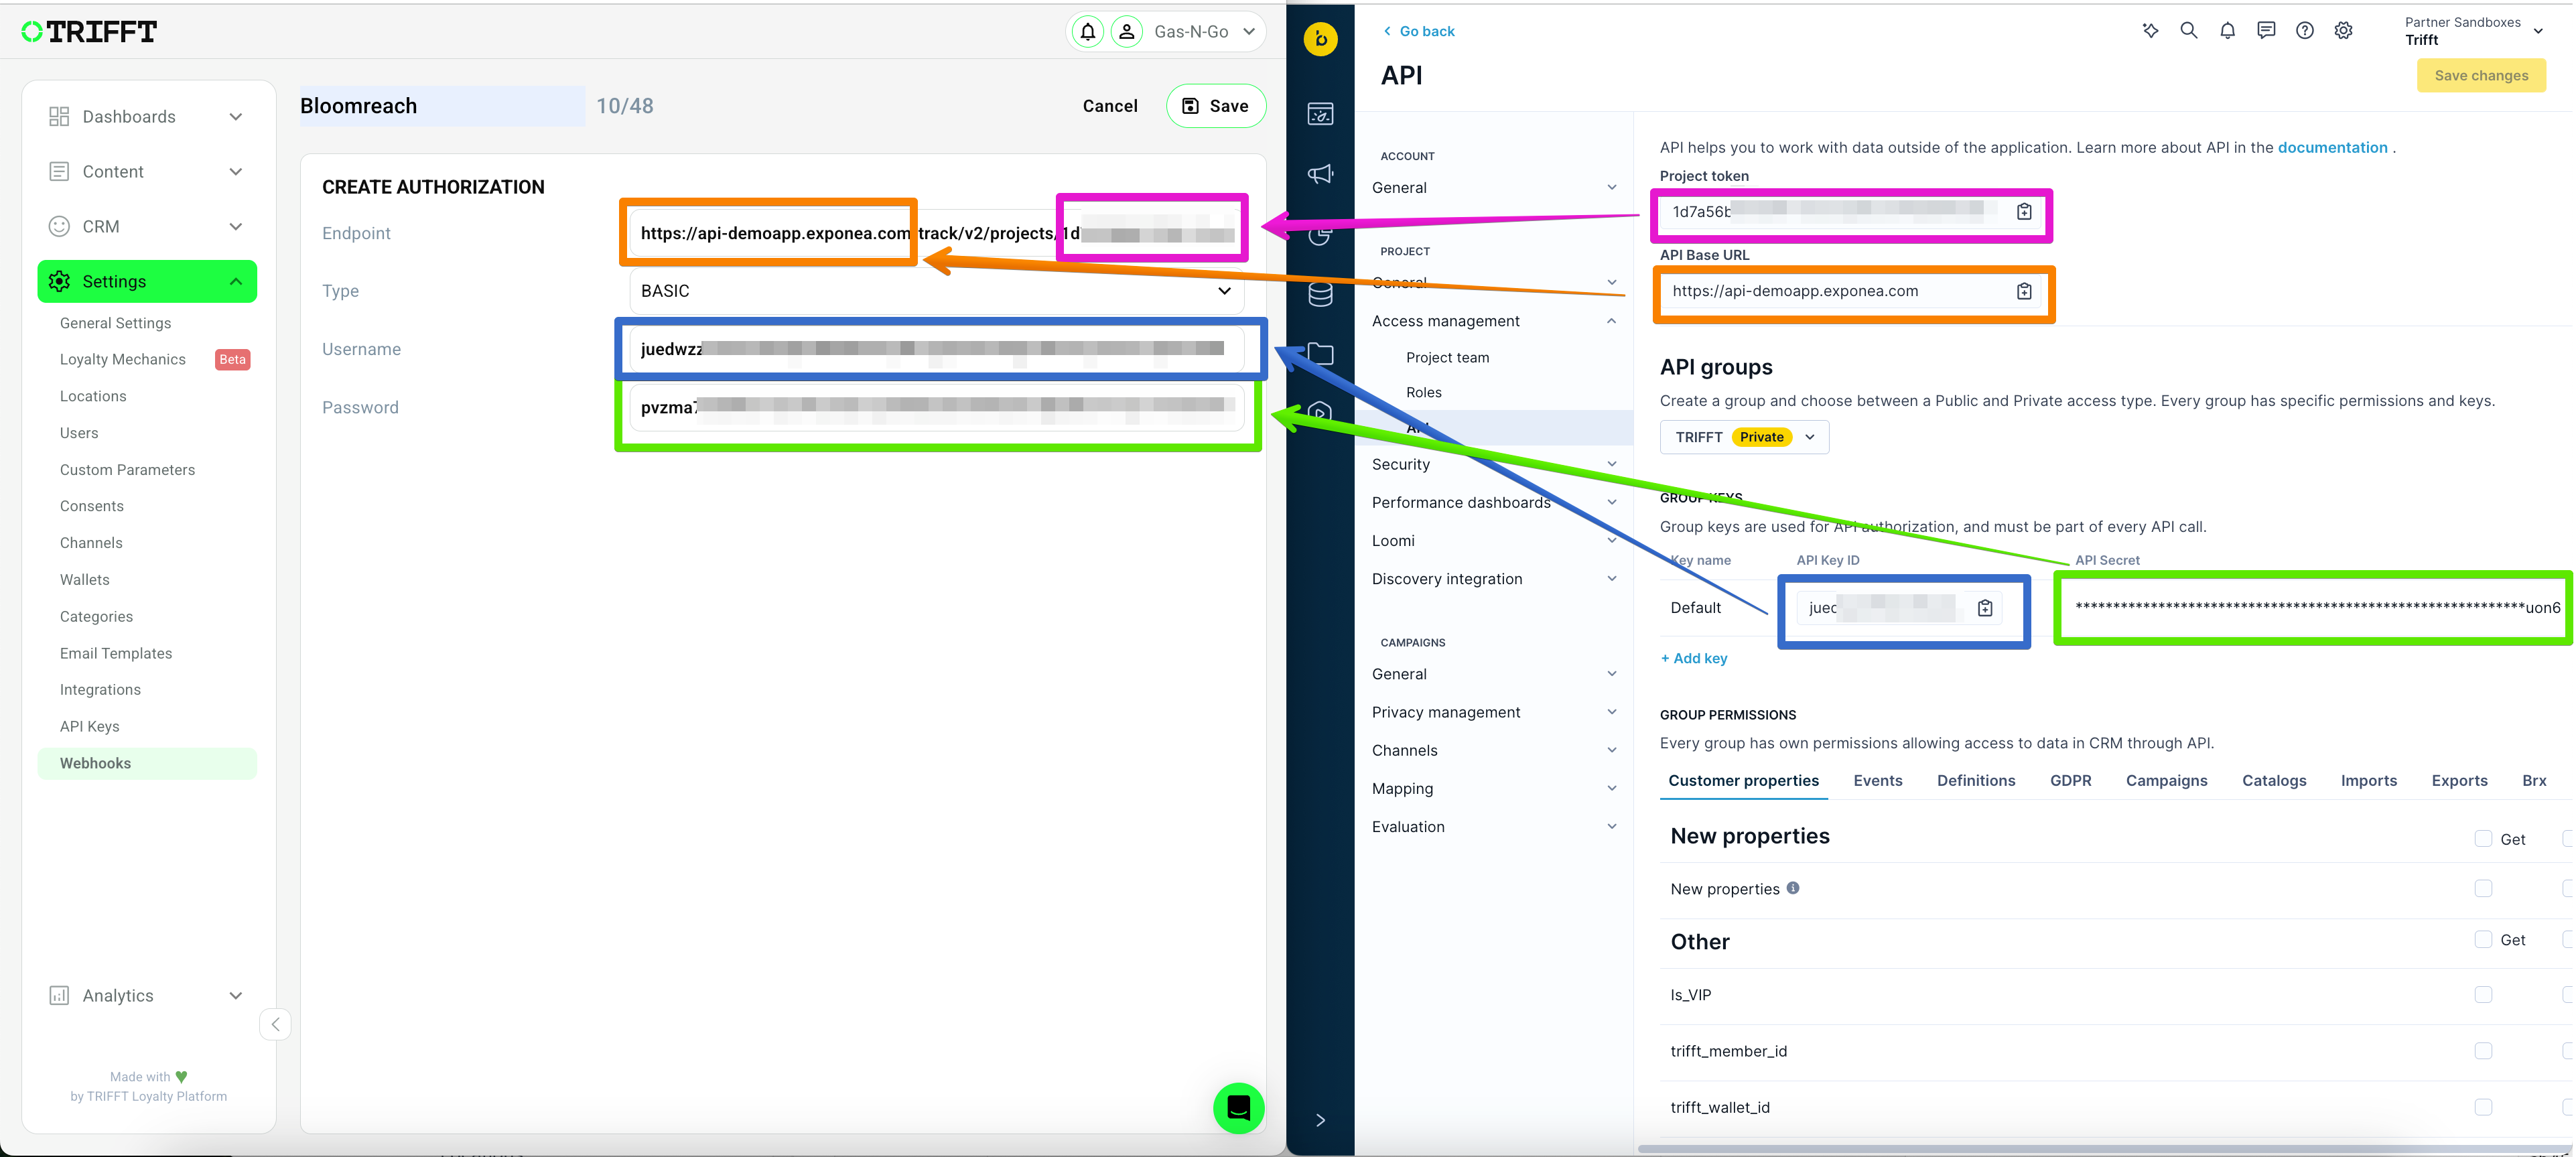
- Configure the authorization:
| Field | Value |
|---|---|
| Name | A clear name, for example Bloomreach. |
| Endpoint | The Bloomreach API Base URL. |
| Type | BASIC |
| Username | Bloomreach API Key. |
| Password | Bloomreach API Secret. |
- Click Save.
Create an event webhook
Create one webhook for each TRIFFT event that should be available in Bloomreach.
- Return to the Webhooks tab.
- Click Add new.
- Configure the webhook:
| Field | Recommended configuration |
|---|---|
| Name | The name you want to use for the Bloomreach event, for example mobile_app_opened. |
| Event | Select the relevant member-associated TRIFFT event. |
| Enable authorization | Enabled. |
| Authorization | Select the Bloomreach authorization created above. |
| Endpoint URL | Append /customer/events to the Bloomreach API Base URL. This suffix may alternatively be included in the authorization endpoint. |
| Endpoint type | POST |
| Log only errors | Enabled for production; disable temporarily when full logs are required during testing. |
| Payload type | JSON |
| Payload | A JSON body using the required Bloomreach structure and available TRIFFT Jinja variables. |
- Click Save.
Recommended Bloomreach event structure
{
  "event_type": "your_event_name",
  "properties": {
    "example_property": "{{ event.example }}"
  },
  "customer_ids": {
    "email_address": "{{ member.email }}",
    "trfft_loyalty_id": "{{ member.id }}"
  },
  "timestamp": "{{ event.created_at | date('U') }}"
}The keys inside
customer_idsmust match the Hard ID and/or Soft ID definitions in your Bloomreach project. A successful HTTP response does not guarantee that Bloomreach assigned the event to a customer.
Identity-mapping checklist
- Confirm which identifier is the Bloomreach Hard ID.
- Confirm which identifiers are configured as Soft IDs.
- Use exactly the same identifier names in
customer_ids. - Confirm the rendered identifier values are not empty.
- Test with a customer who already exists in Bloomreach.
- Verify the event appears in the correct customer's timeline, not only in webhook logs.
3. Create TRIFFT API authorization for Bloomreach
Use this setup when Bloomreach Scenarios need to call TRIFFT APIs.
Generate a TRIFFT API key
- In TRIFFT, navigate to Settings → API Keys.
- Click Add new.
- Enter a note, for example
Bloomreach. - Enable the permissions required by the planned Scenarios.
- For the full two-way setup described in the legacy integration, enable Read Access and Write Access.
- Click Save.
- Copy the generated API token and store it securely.
For production, apply the principle of least privilege whenever the API-key permission model allows it. Use a separate key for Bloomreach so its traffic and access can be isolated.
Create HTTP Authentication in Bloomreach
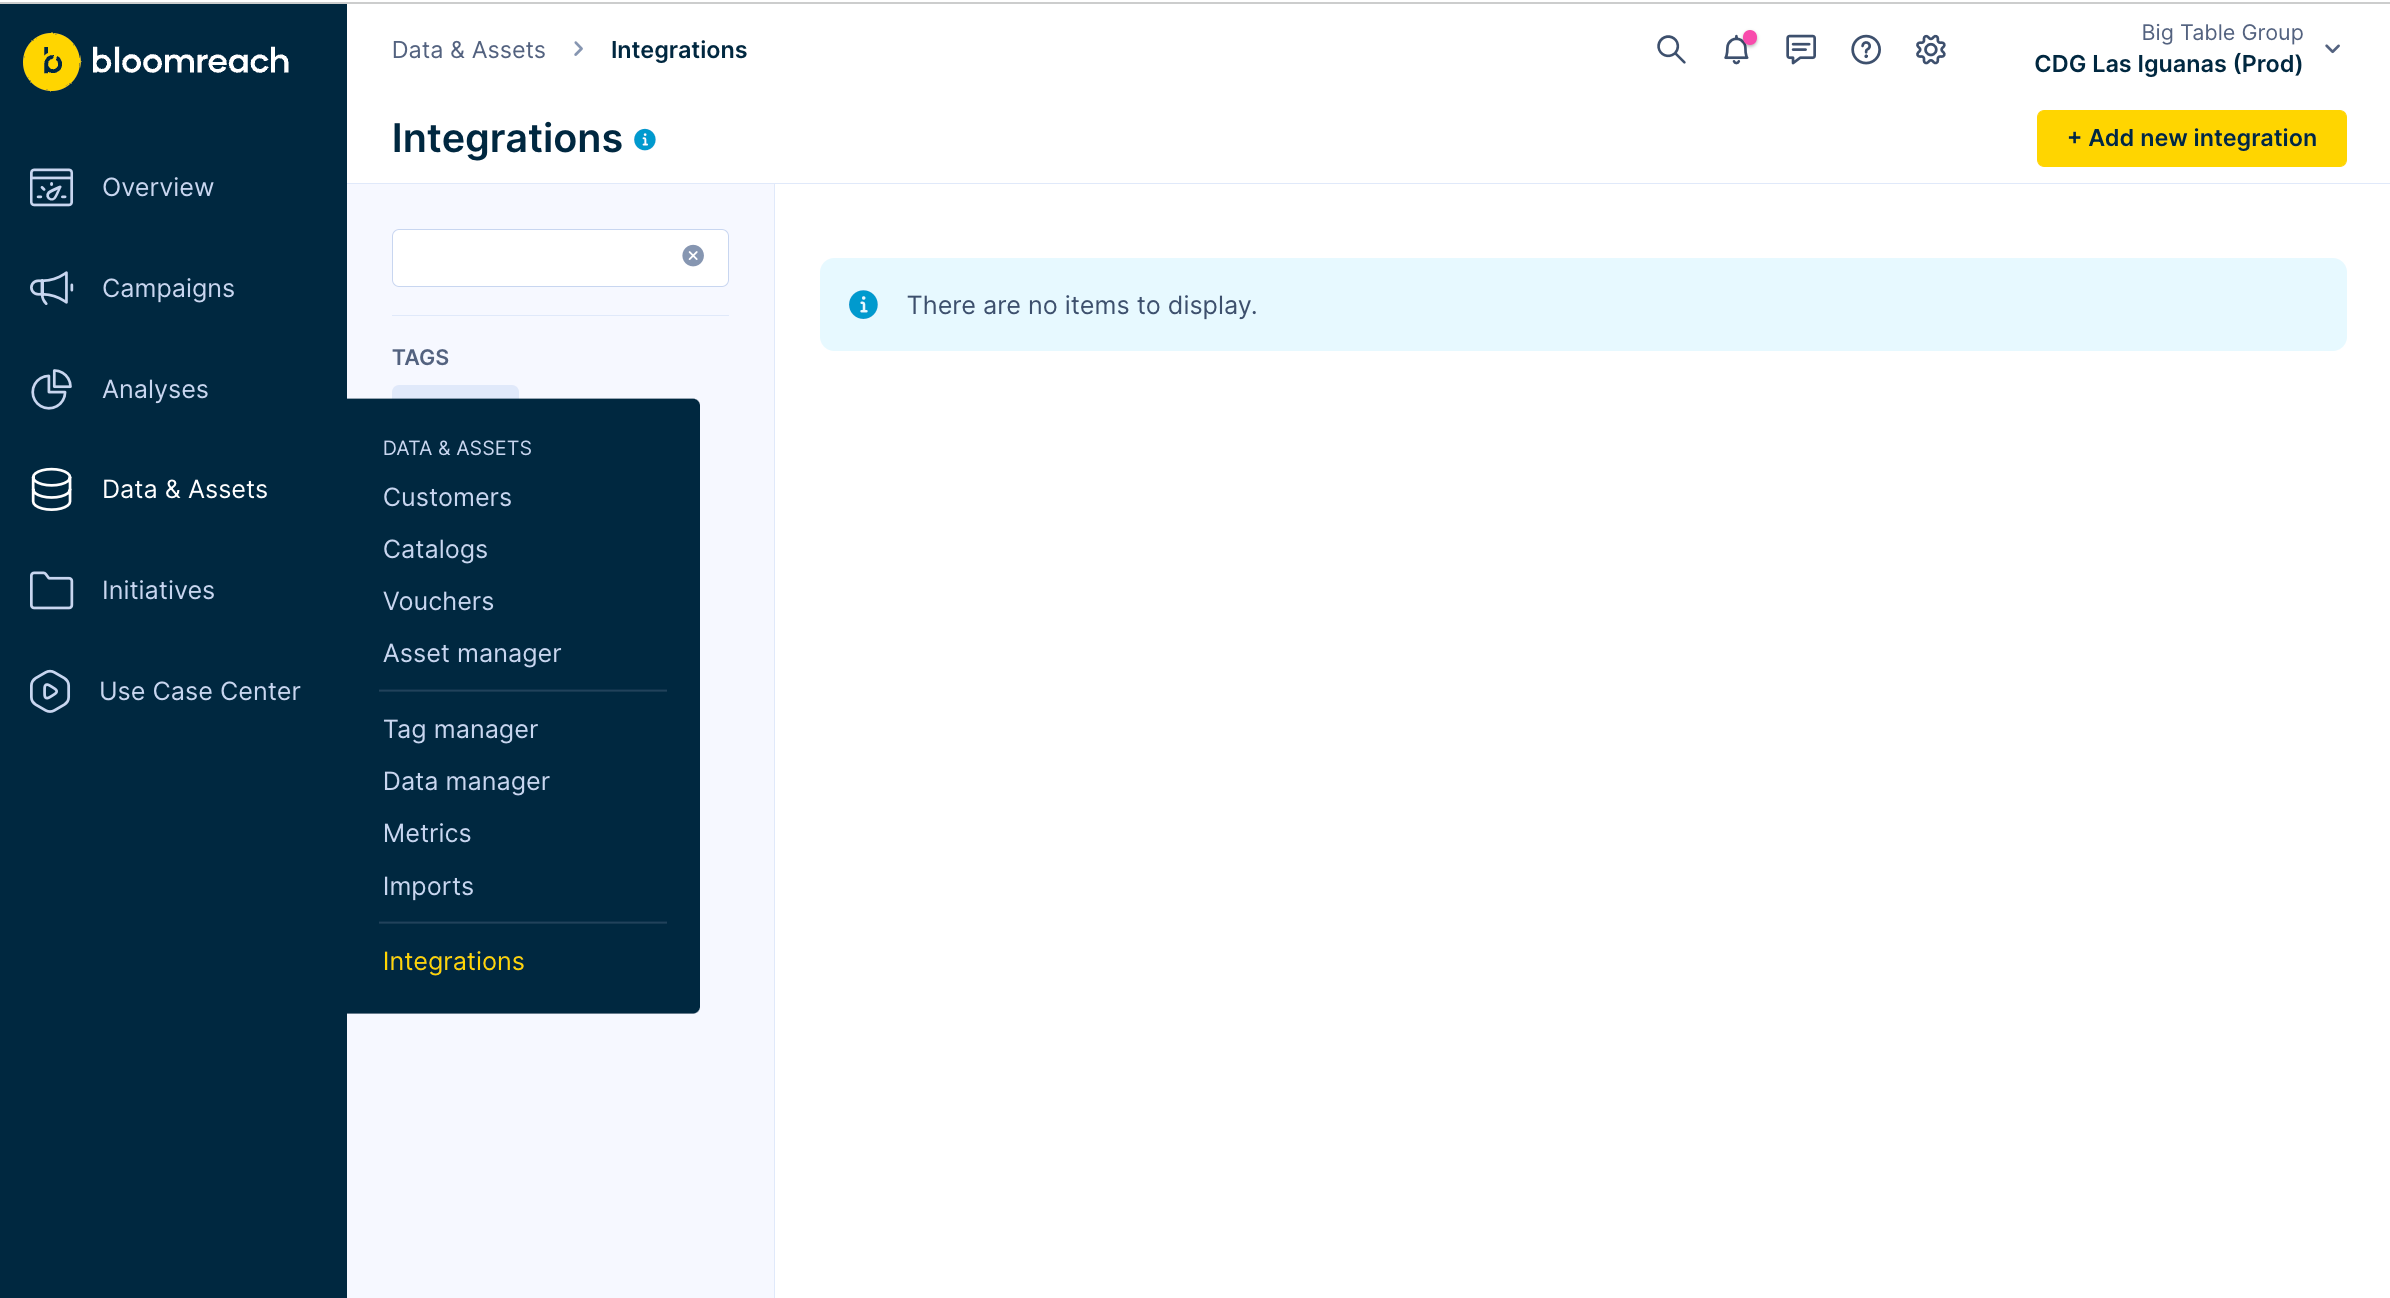
- In Bloomreach, go to Data & Assets → Integrations.
- Click Add new integration.
- Select HTTP Authentication Schemas.
- Configure the integration:
| Field | Value |
|---|---|
| Endpoint | https://api.trifft.io/v1 |
| Authentication type | Custom headers |
| Header: Authorization | Bearer YOUR_TRIFFT_API_KEY — store as a secret. |
| Header: accept | application/json — public value. |
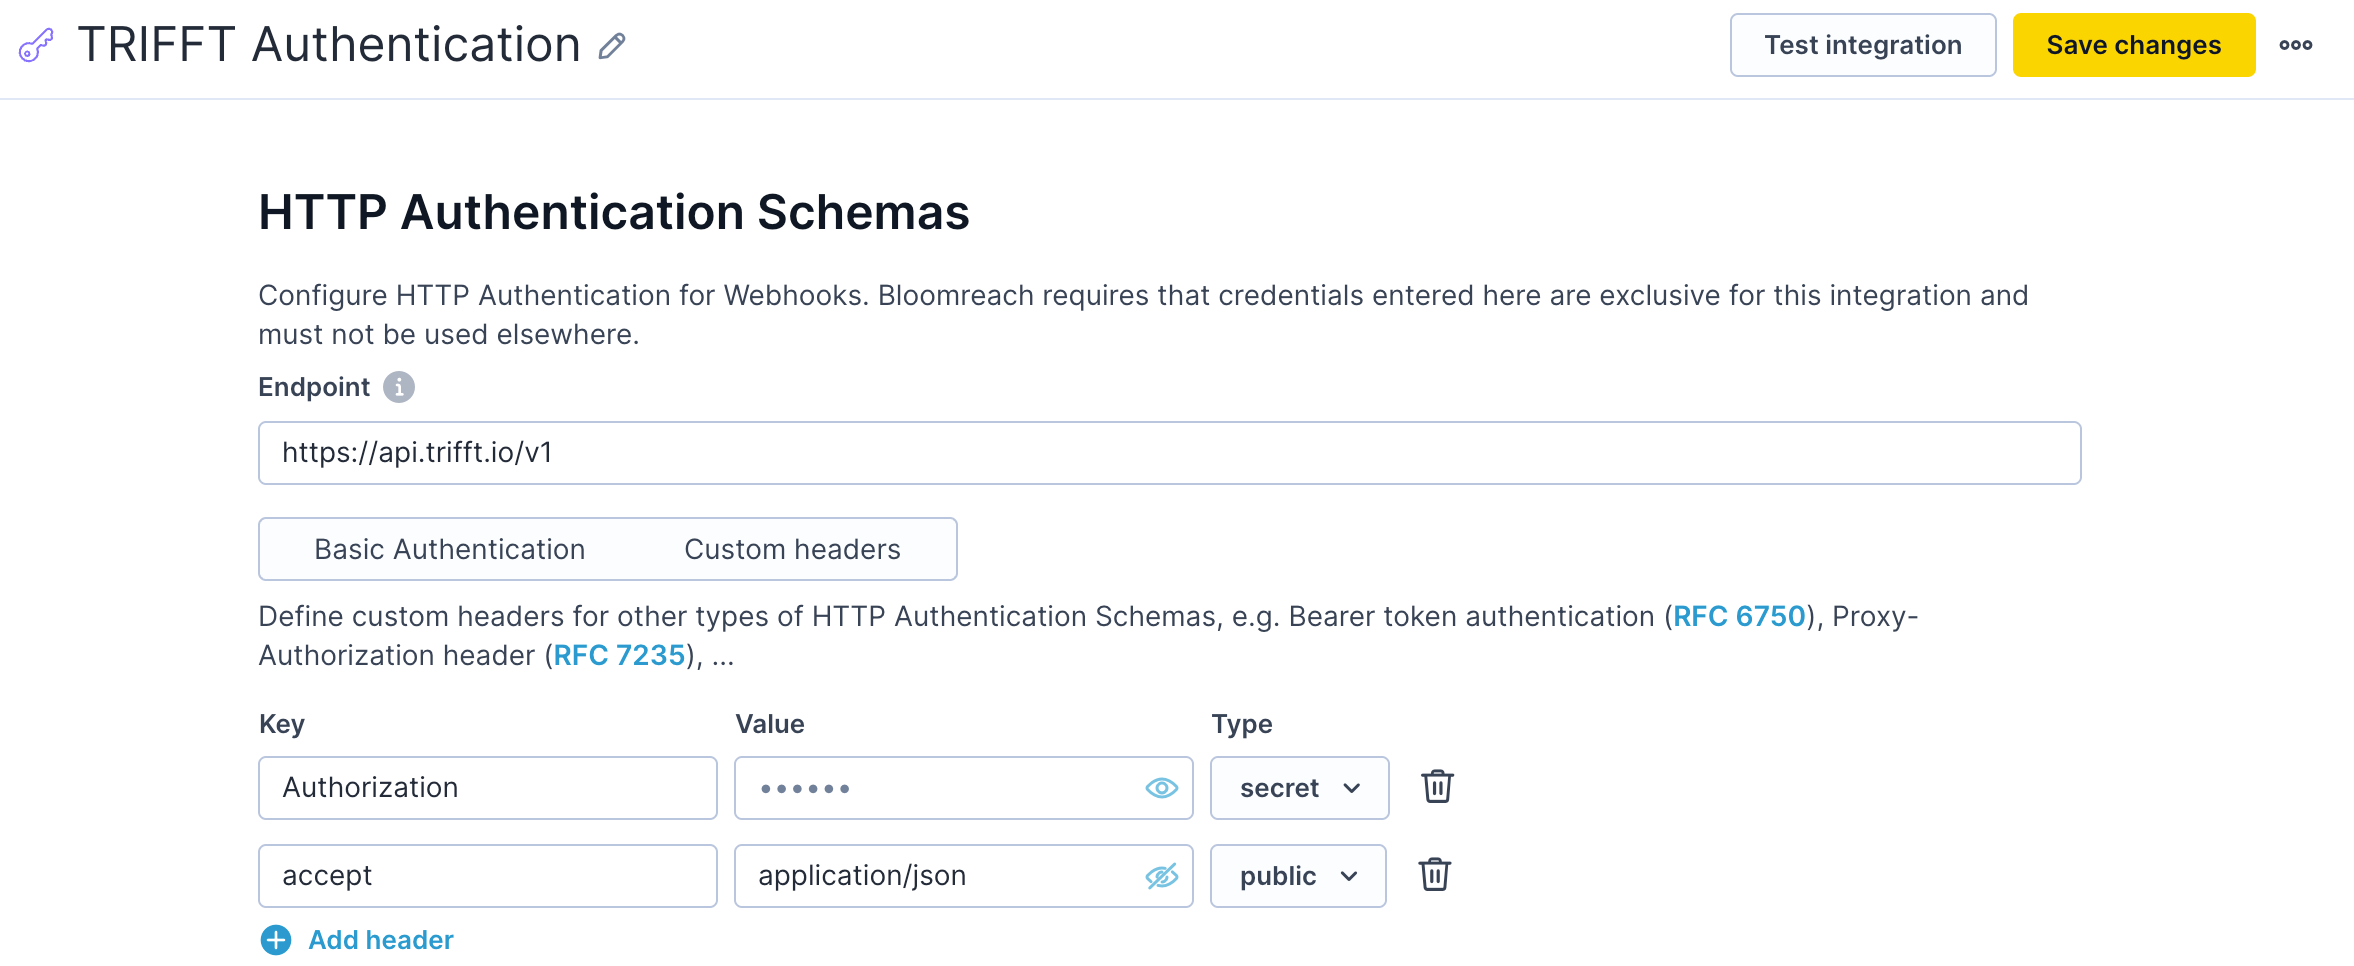
- Save the integration.
For requests with a JSON body, also add:
content-type: application/json4. Create TRIFFT webhook presets in Bloomreach
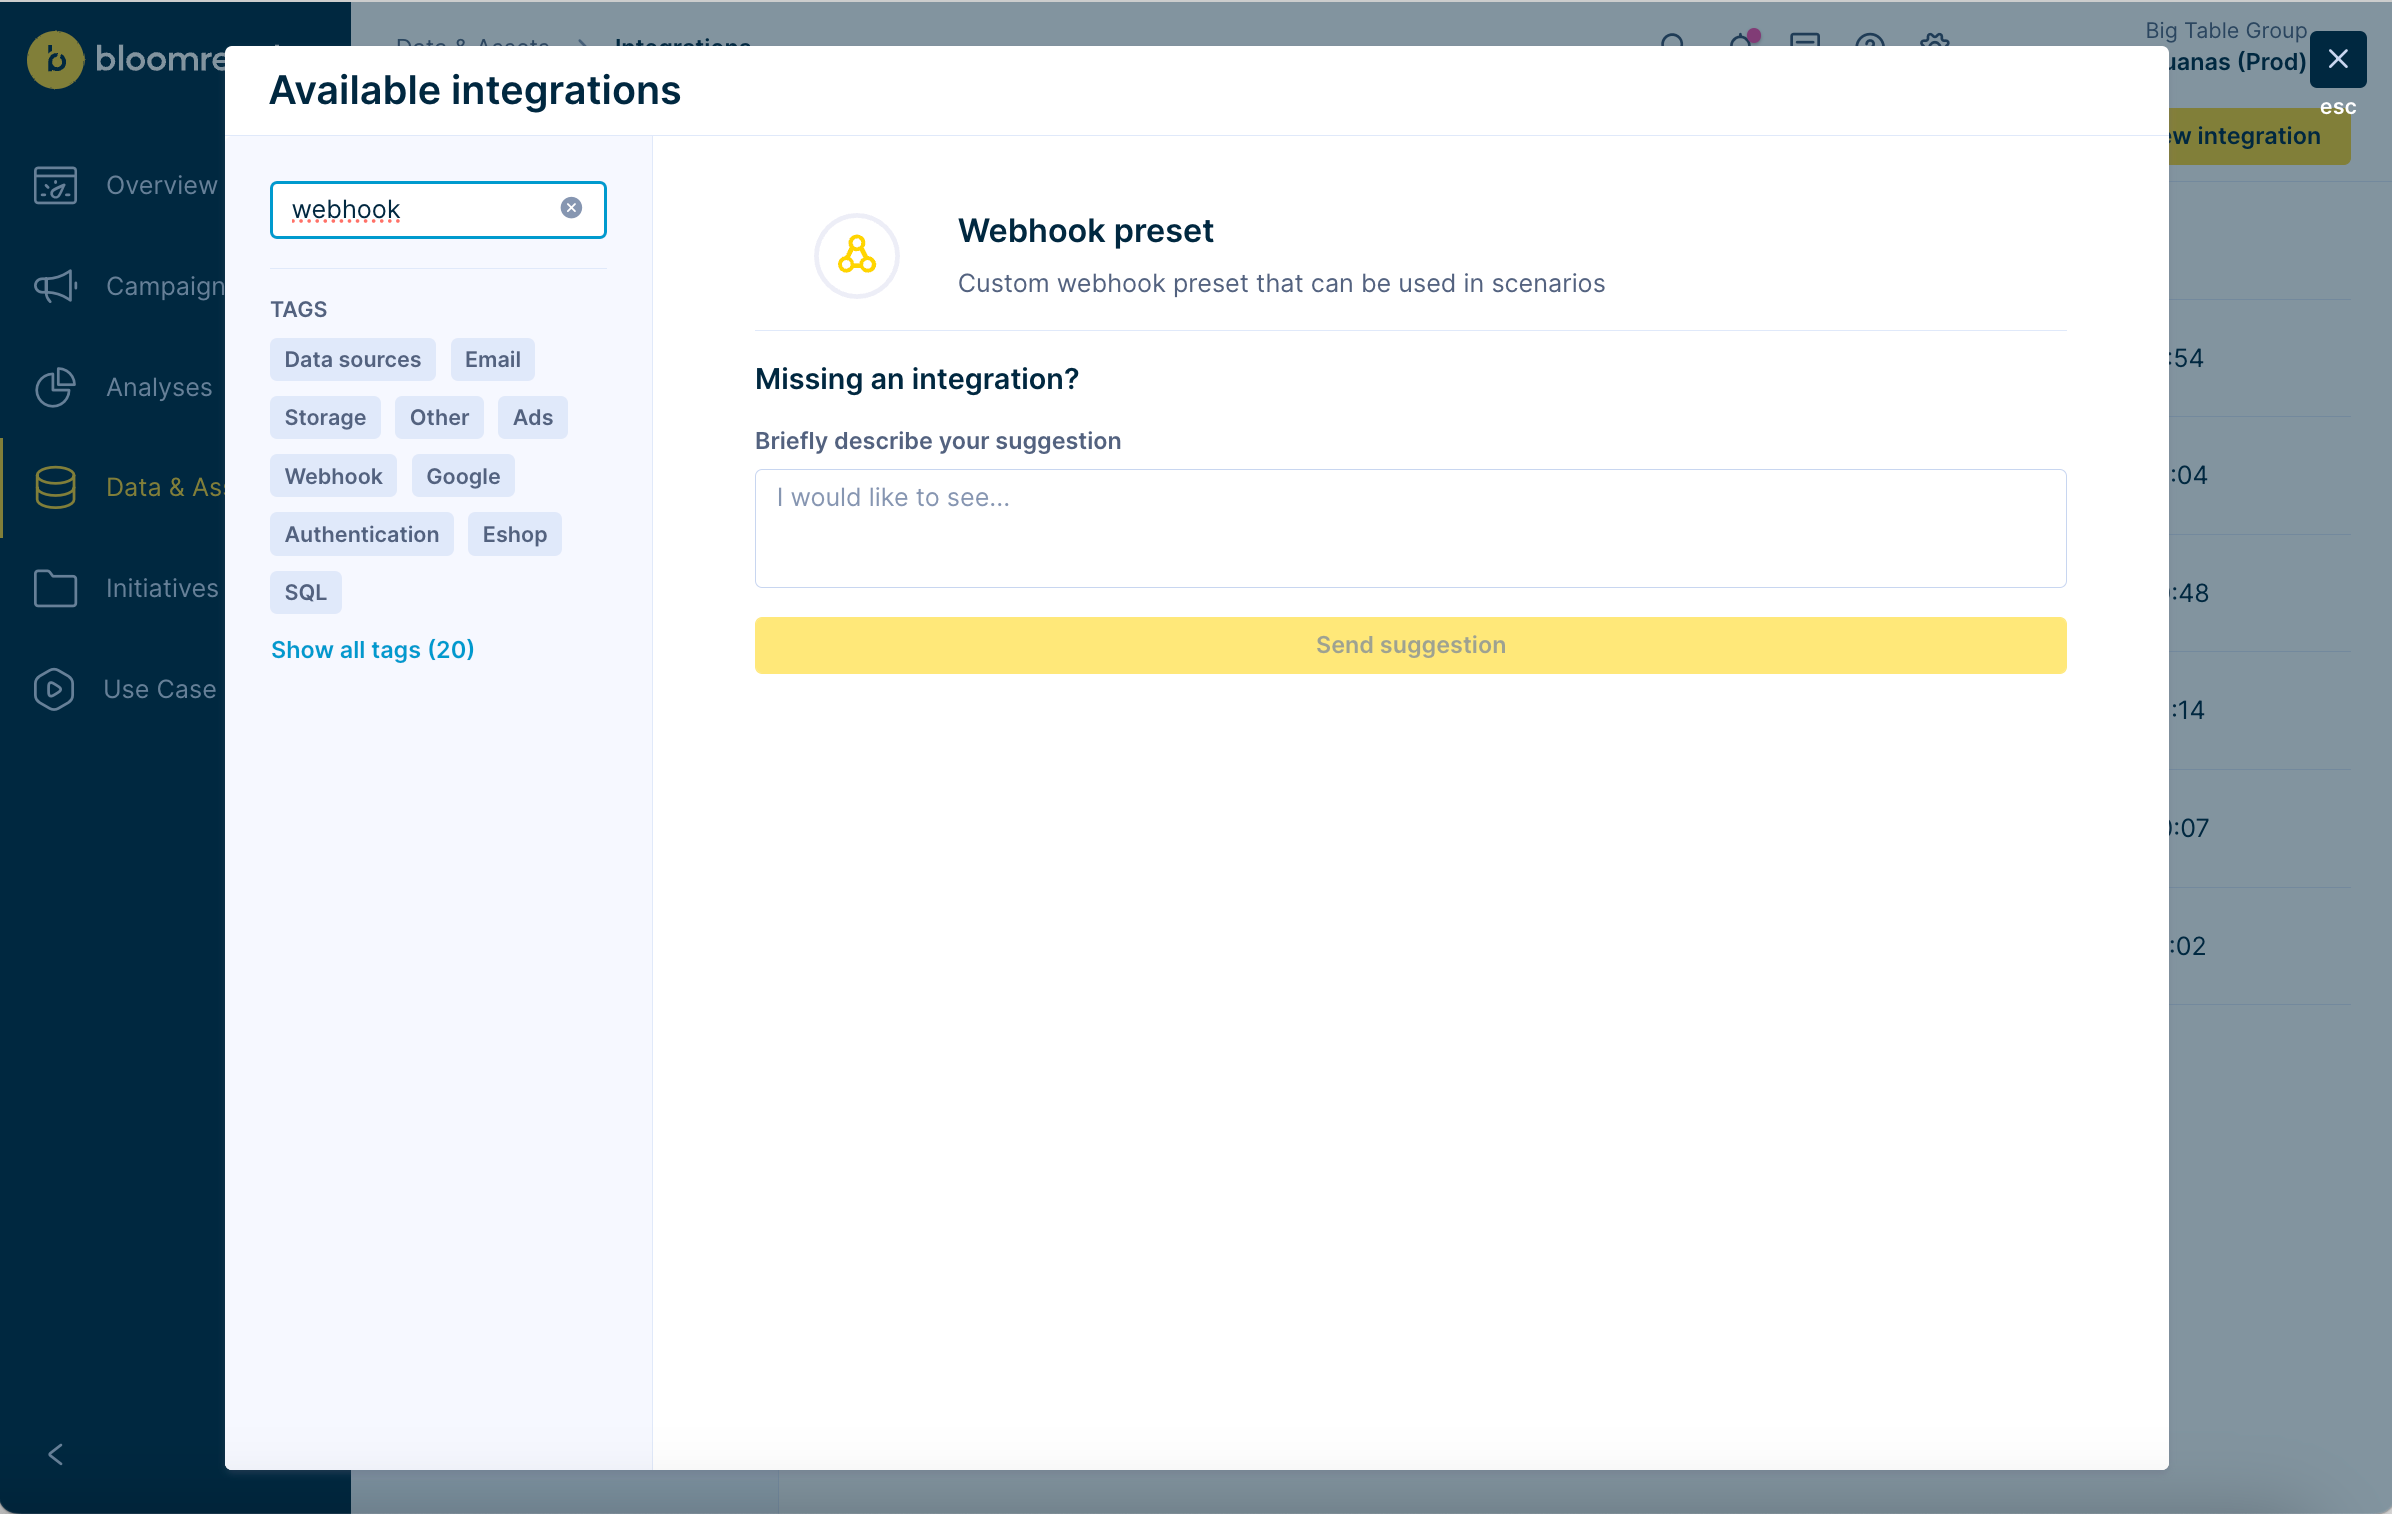
Webhook presets make TRIFFT actions reusable across Bloomreach Scenarios.
- In Bloomreach, go to Data & Assets → Integrations.
- Select Webhook preset.
- Choose the TRIFFT HTTP Authentication schema.
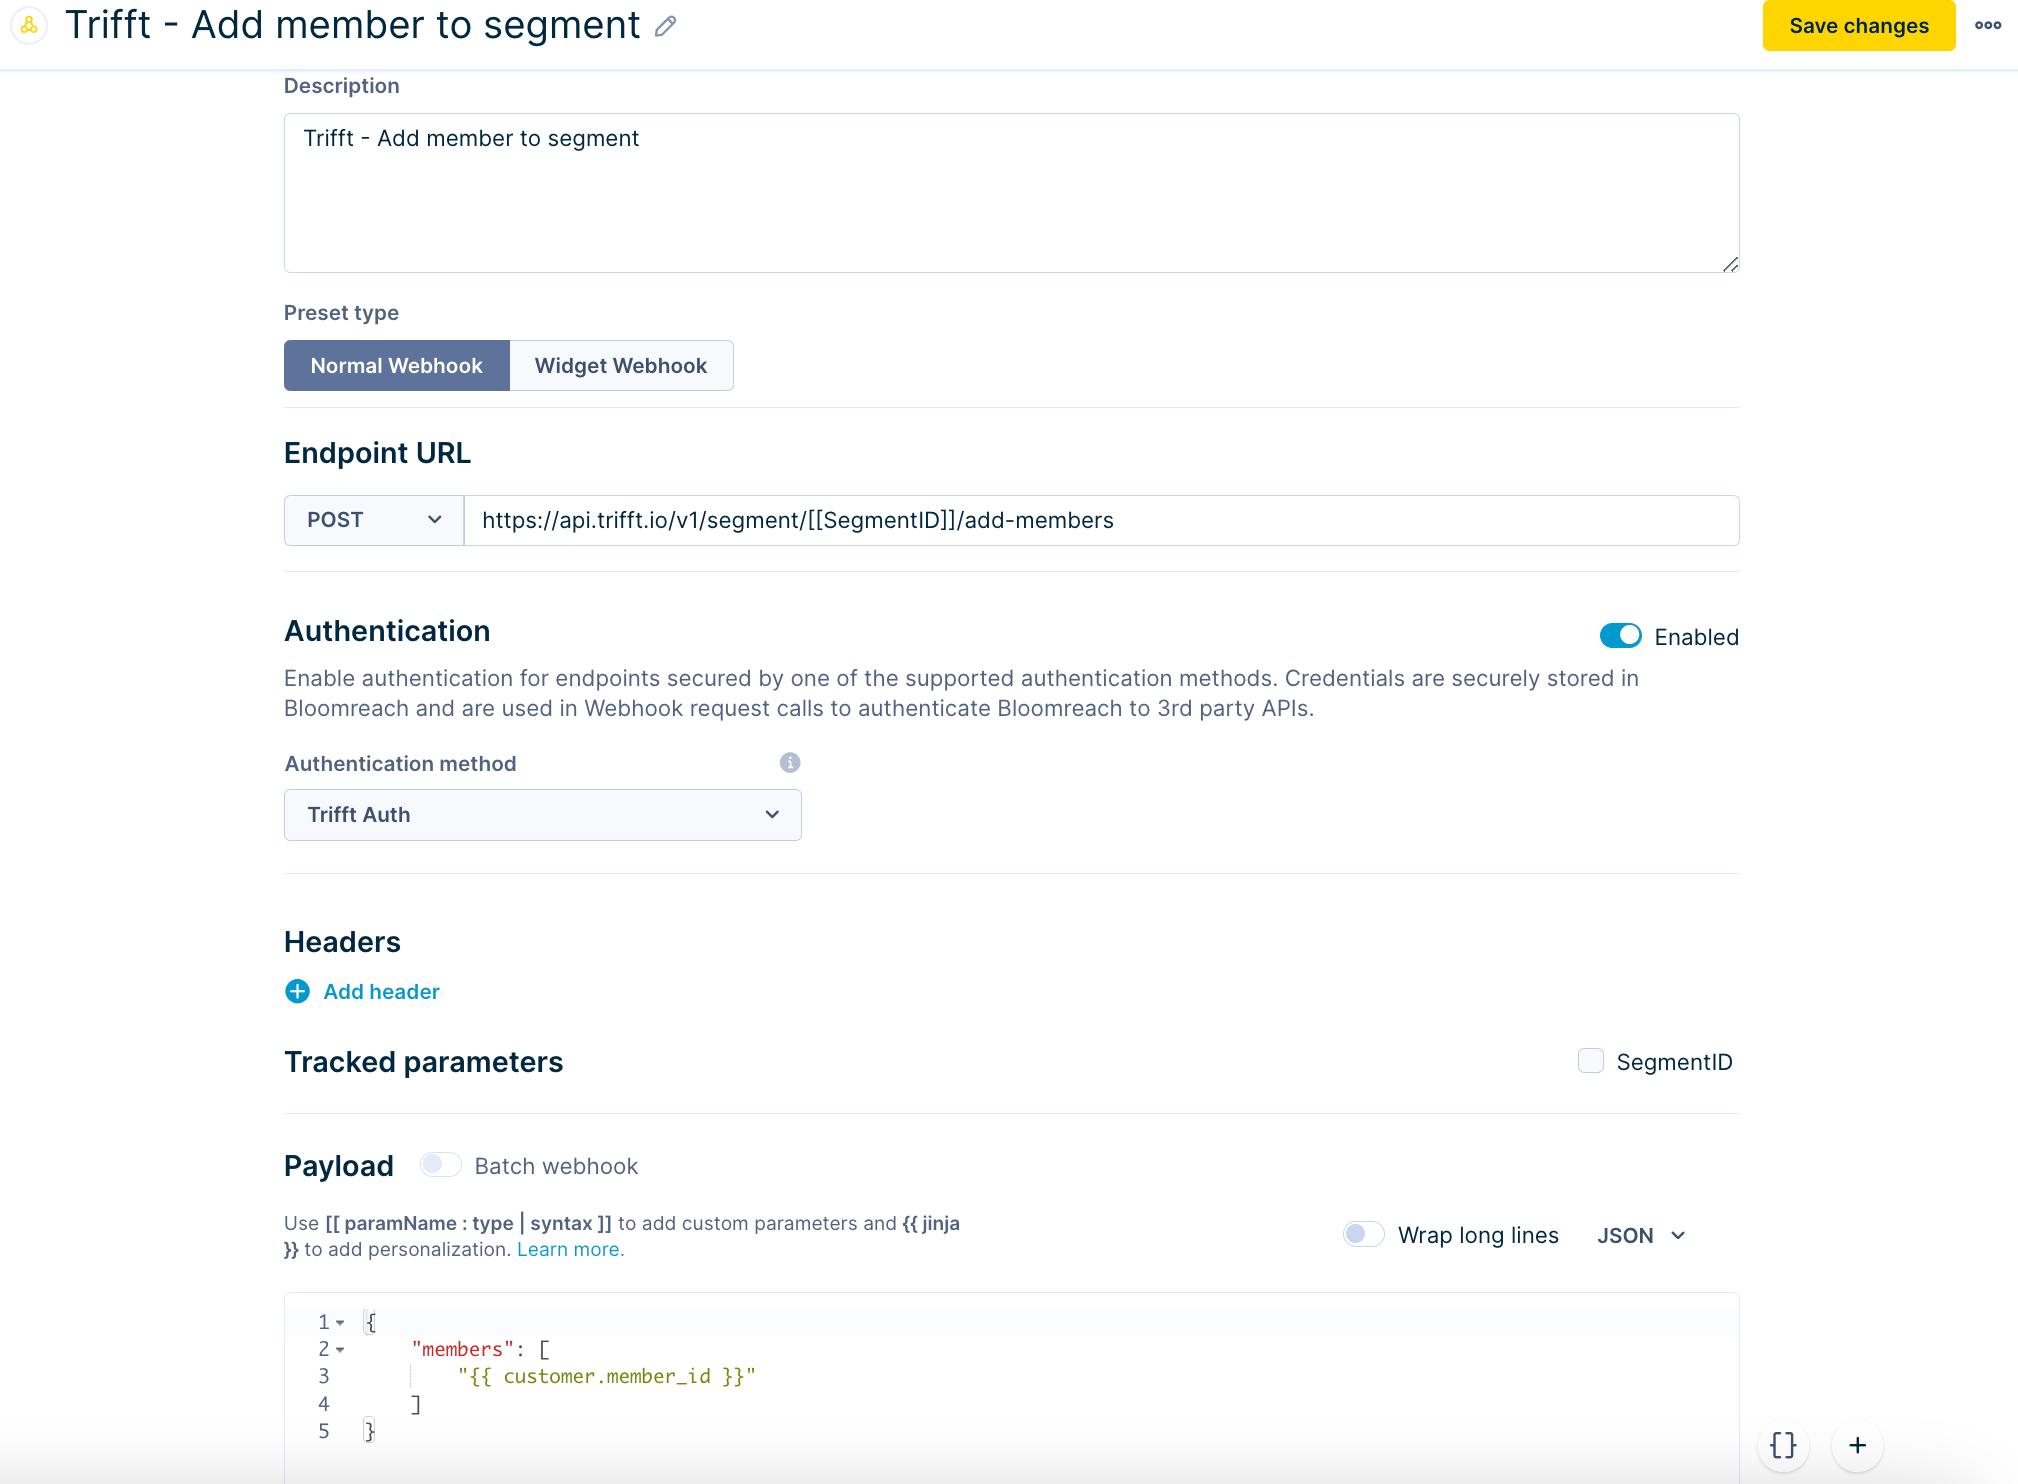
- Configure the endpoint path, HTTP method, headers, and payload required by the selected TRIFFT REST API operation.
- Save the webhook preset.
- Open or create a Bloomreach Scenario.
- Add Actions → Other → Custom webhook.
- Select the webhook preset.
- Preview the rendered request with a test customer.
- Run the Scenario for a restricted test audience.
Typical TRIFFT actions include:
- Assign a coupon.
- Credit or debit a wallet.
- Add a member to a segment.
- Remove a member from a segment.
- Send a personalized notification.
For large-volume operations, use TRIFFT batch or bulk APIs. Adding thousands of members to a segment through simultaneous individual requests is not a reliable production design.
Example flow: add a member to a segment
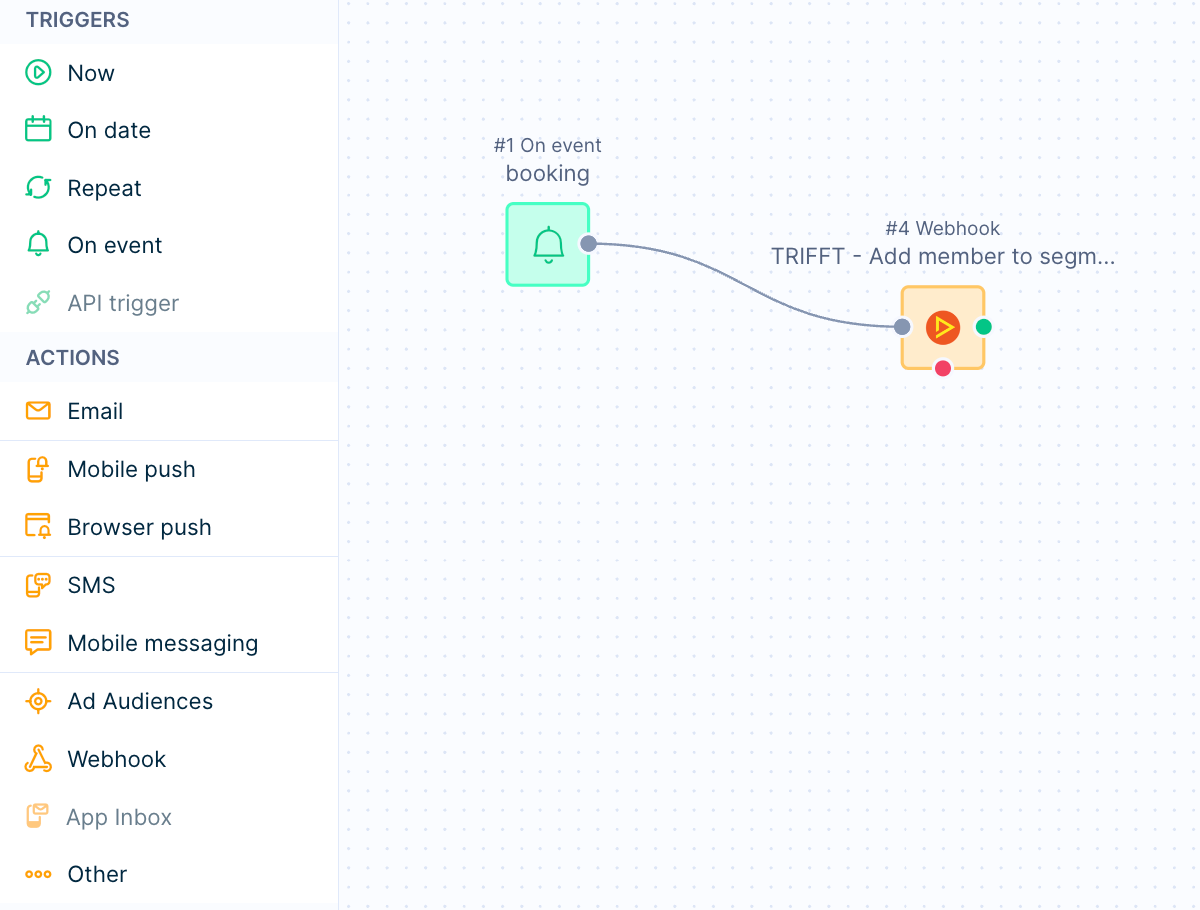
- Create a Bloomreach Scenario.
- Add the required trigger and conditions.
- Add the preconfigured TRIFFT segment webhook.
- Pass the customer's TRIFFT member ID and the target segment ID.
- Test the request.
- Confirm the member is visible in the TRIFFT segment.
Example: In this scenario, on event "Booking", a user is added to a TRIFFT segment "Booked"
5. Enable Client Zone / Web Portal tracking
Enable this when Bloomreach Weblayers should appear in the TRIFFT Web Portal or Client Zone.
- In TRIFFT, navigate to Settings → Integrations → Bloomreach.
- Open the Settings tab.
- Scroll to Tracking.
- Enable Client Zone tracking.
- Save the configuration.
- Create and activate the required Bloomreach Weblayer.
- Test with a customer who belongs to the Weblayer audience.
6. Configure Bloomreach mobile push for white-label apps
Prerequisites
Confirm that:
- The white-label mobile app is provisioned and distributed by TRIFFT.
- The app contains the Bloomreach Mobile SDK.
- The Bloomreach integration is enabled in TRIFFT.
- The base endpoint, project token, and authorization details are configured.
- The test member has a valid mobile push token.
iOS: Apple Push Notification Service
Create the APNs integration
- In Bloomreach, navigate to Data & Assets → Integrations → Add new integration.
- Select Apple Push Notification Service.
- Open the integration editor.
- Enter:
| Credential | Description |
|---|---|
| Environment | Select the appropriate production configuration. |
| Team ID | Apple Developer Team ID. |
| Key ID | ID of the APNs authentication key. |
| Private Key | Full content of the downloaded .p8 file. |
| Application Bundle ID | Bundle ID of the specific TRIFFT white-label app. |
The private key must include the complete block:
-----BEGIN PRIVATE KEY-----
[KEY CONTENT HERE]
-----END PRIVATE KEY-----
Obtain Apple credentials
- Open the Apple Developer account's Keys section.
- Create a new key with APNs access.
- Download the
.p8file and store it securely. - Copy the Key ID.
- Copy the Team ID from the Apple Developer account.
- Copy the app's Bundle ID from Certificates, Identifiers & Profiles.
The Key ID and private key should be created for the individual app or the relevant company project. After downloading the
.p8file, copy the full contents including the BEGIN and END lines.
Assign APNs to the iOS channel
- Go to Settings → Project settings → Channels → Push notifications.
- Under iOS notifications, select the Apple Push Notification Service integration.
- Save changes.
Android: Firebase Cloud Messaging
Create the Firebase integration
- In Bloomreach, navigate to Data & Assets → Integrations → Add new integration.
- Search for Firebase.
- Select Firebase Cloud Messaging.
- Accept the terms and continue.
- Open the Firebase Cloud Messaging integration editor.
- Paste the required Firebase service-account credentials/private key.
The private key must preserve its full format:
-----BEGIN PRIVATE KEY-----
[KEY CONTENT HERE]
-----END PRIVATE KEY-----Ask the mobile-development team for the correct Firebase service-account key. Regenerating or replacing the active key may invalidate the previous configuration and can affect push delivery.
Assign Firebase to the Android channel
- Go to Settings → Project settings → Channels → Push notifications.
- Under Android notifications, select the Firebase Cloud Messaging integration.
- Save changes.
Test mobile push
- Create a small test segment or manual test trigger in Bloomreach.
- Add a Mobile Push node to a test Scenario.
- Select a test customer with a valid iOS or Android push token.
- Run the Scenario.
- Confirm delivery on the test device.
- Review Bloomreach execution logs if the push is not delivered.
7. Validate the complete integration
Test TRIFFT → Bloomreach
- Select a test member that exists in both platforms.
- Trigger a configured TRIFFT event, for example member verification, app open, transaction, or coupon activity.
- Open the corresponding customer profile in Bloomreach.
- Confirm the event appears in the customer timeline.
- Inspect the event properties and timestamp.
Test Bloomreach → TRIFFT
- Create a test Scenario with a restricted audience.
- Add a TRIFFT webhook preset, for example adding a test member to a segment.
- Preview the request and confirm all variables render correctly.
- Execute the Scenario.
- Confirm the result in the TRIFFT member detail and event history.
Test personalization channels
- Confirm the Client Zone Weblayer appears only for an eligible test member.
- Confirm a Bloomreach in-app campaign renders in the correct TRIFFT Placeholder ID.
- Confirm iOS and Android push delivery independently.
Configuration checklist
Bloomreach credentials
- API Base URL and Project Token copied from the correct Bloomreach project.
- Private API group created.
- API Key and API Secret stored securely.
- GET and SET permissions enabled for Customer Properties and Events.
TRIFFT → Bloomreach
- BASIC authorization configured in TRIFFT.
- Event endpoint includes
/customer/events.- Payload is valid JSON.
- Hard ID / Soft ID mapping verified on a real test profile.
Bloomreach → TRIFFT
- Dedicated TRIFFT API key created.
- Bloomreach HTTP Authentication uses
Authorization: Bearer ....- Webhook presets tested with a restricted audience.
- Batch or bulk endpoints selected for large audiences.
Channels
- Client Zone tracking enabled when Weblayers are required.
- APNs configured and assigned for iOS when required.
- Firebase configured and assigned for Android when required.
- Push delivery tested on physical devices.
Updated 6 days ago